Two ways to scan directly to Evernote
Evernote is one of the fastest-growing ways to get organized. It’s a complete software suite that helps the user make “notes” (which can be anything – handwritten reminders, receipts or newly-created content) to stay on top of life. Remember: An elephant never forgets. It’s also available on PC, Mac and all of the major smart phone UIs.

Scanner users can quickly scan and incorporate their physical documents into Evernote in a few different ways. The first is with the Presto! PageManager 9 software, now bundled with all Ambir ADF scanners. The second method utilizes Evernote’s Import Folders function.
PageManager 9:
First, open PageManager, and make sure you’re logged into Evernote. You can do this with one click on the Evernote icon, near the top right of the screen:
Once you’re logged in, you’ll need to set a path for your scan to follow. To do this, click on Scan Buttons Settings in the upper left:
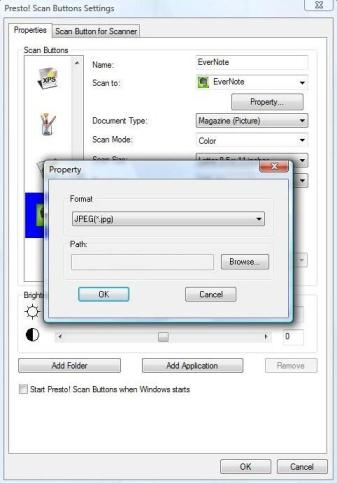
In the resulting Settings popup window, scroll down to the Evernote scan button on the left-hand side of the window (highlighted blue on the screenshot), click the “Property…” button and select the image format and the path you’d like the note to follow within Evernote.
You’ll now notice a section titled “Cloud Services” where you can view your Evernote folder directory. It’s located on the left side of the interface. Here’s what a basic directory looks like:
After you’ve set your desired path, open your Scan Buttons and click “Scan to Evernote” (It’s the green elephant button), and follow your normal scanning procedure.
After that, you’ll find your note waiting for you in Evernote, right where you wanted it.
Evernote Import Folders:
Another way to scan directly to Evernote uses Evernote’s Import Folders. First, you’ll need to create a new folder somewhere on your PC (or Mac), perhaps in your My Documents folder. You can name it whatever you’d like. We’re not picky.
Within Evernote, select “Import Folders…” from the Tools dropdown menu. In the resulting window, click “Add” to create a new Import Folder. Find the folder you just created in Windows (or Mac OS) and click “OK”.
Following that, just select the Import Folder as your file destination within your normal scanning software, follow your normal scanning routine and you’ll be scanning straight to Evernote in no time.
Happy scanning!


I had forgotten about the Import Folders option. Works perfectly for what I need to do. Thanks!
No problem, Evan. Glad to help!
Very helpful with my dated scanner, thanks!
Happy we could help!
Thank you for the hint. Import folders works great!